Environmental Tester
Overview
For this assignment I was allowed to design and construct my own project. I was working with Atlantic White Cedar saplings at the time and decided I wanted to test conditions involved with their growth. The factors I decided to test were soil moisture, temperature, humidity, and light levels.
Parts Used
- Arduino Uno
- Grove - Soil Moisture Sensor
- Temperature & Humidity Sensor (DHT11)
- Seeed Studio SD Card Shield V4
- 6 LEDs
- 6 Resistors (resistance dependent on LED used)
- Photoresistor
- Button
- Grove - 16X2 LCD RGB Backlight - Full Color Display
- Wires
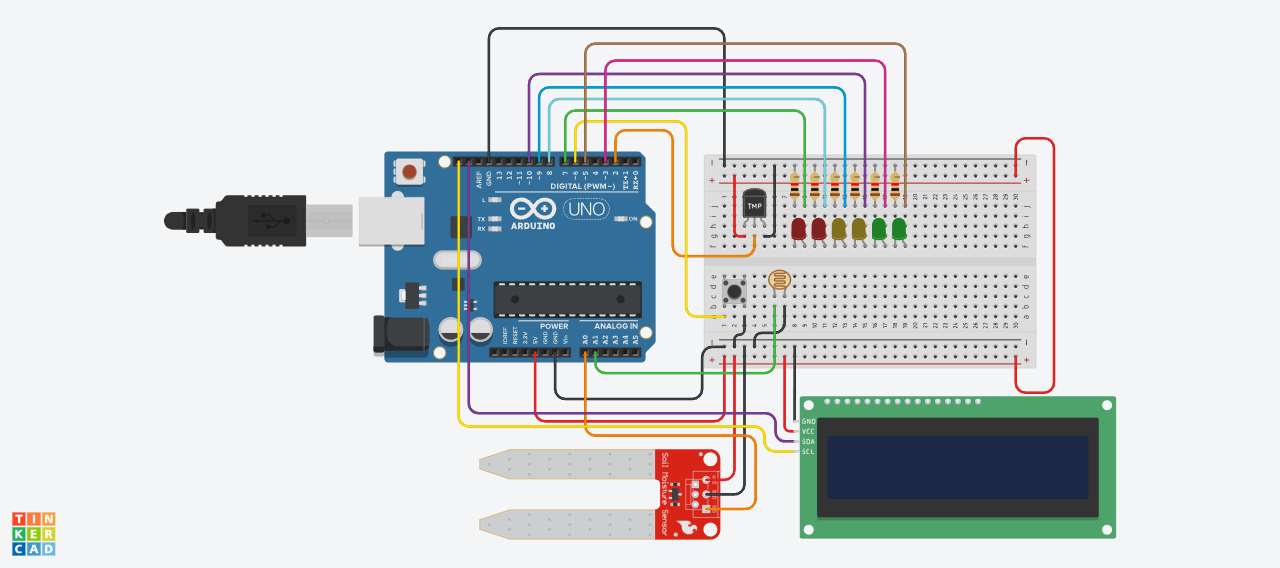
Design Layout
Code
Summary
For this project I was thinking about when a plant grows what are the most important factors to affect that. For this reason, I chose to use the temperature and humidity sensor, the light sensor, and the soil moisture sensor. These given sensor reflect a large range of conditions that can affect growth rate.
Once I decided on what I wanted I started to build it. One problem that I faced was that for the system that I wanted to set up it was tricky to work around the pins that have multiple uses. For example, I wanted to set up an LED array that would light up according to how much moisture was in the soil (using a similar technique to what was used for the listening to music project). I had 6 LEDs set up however one of the pins that I was using for them kept making the LED light up when there was writing being done. For this reason, I had to switch around where I originally had them until I could find a set of digital pins that weren’t being utilized elsewhere.
After I had worked out the physical components, I had to actually code the processes. This assignment required that I had at least two functions in the code. My first function was to quicky turn off all LEDs present. I used this code as a reset every time I pressed a button to take a new measurement. This allowed me to keep the LEDs on after a reading so that they wouldn’t just immediately shut off. The second function I added was to make a average sensor reading for my moisture sensor based on the amount of readings I told it to take. This allowed me to take an average reading of humidity to make it more reliable. Overall, these functions made my device more functional as it allowed me to deal with a somewhat unreliable sensor as well as keep the visual indicators on for as long as needed until a new data point would be taken.
As for the actual logic of my code, I used a while loop to stop my code from running until I was ready to take a data point. I could switch this to an If..ELSE… loop however because I already had a couple of those in my code I feel as though it would just add on unneeded processing time slowing down the process as a whole. As for some of my other loops, I don’t believe I could have switched them. I have an IF..ELSE… loop that checks to make sure that the probe is actually inserted into the soil. I could technically switch this with something else, but I like this method as in my else I have an indicator printed on the LCD screen to let the user know that the probe isn’t inserted. This solution seems more memory efficient than using something like a while loop to do the same thing. Plus, with this solution, when the probe is finally inserted the code doubles back and waits for a button press instead of running the code like a while loop would do.
In total I had a lot of fun making this project. If I had to make a follow up project I would make a smaller data logger for my variables that would be cheap and easily reproduceable.